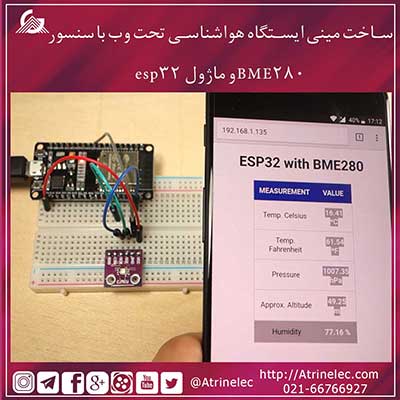
در این پروژه تحت وب ، به کمک ماژول esp32 اطلاعات سنسور BME280 دریافت و نمایش داده میشود.سنسور BME280 قابلیت اندازه گیری دما ، رطوبت و فشار رو داره و شما براحتی قادر به ساخت یه ایستگاه هواشناسی کوچک تحت وب خواهید بود.
در صورت نیاز به آشنایی بیشتر با ماژول BME280 میتونید مطلب قبلی سایت رو از اینجا بخونید.

قبل از ادامه، لازمه تا ماژول ESP32 شما در نرم افزار Arduino IDE نصب باشه در صورتی که نصب نیست میتونید از اینلینک اموزش نصب در ویندوز و از این لینک آموزش نصب پلاگین esp32 درمک و ولینوکس رو مشاهده کنید. البته در پست قبلی سایت مطلبی در مورد نحوه ایجاد صفحه تحت وب در esp32 رو برای شما آموزش دادیم (وب سرور ESP32 با کمک Arduino IDE )
قطعات لازم برای این پروژه ماژول esp32 ، سنسور BME280 ، چند سیم ارتباطی و یه برد برد هست ( به همین سادگی)
ابتدا طبق نقشه شماتیک زیر مدارتون رو ببندید

همونطور که در نقشه شماتیک بالا دیدی از پایه های i2c برای ارتباط با ماژول استفاده شده است . برای کار با این ماژول در آردینو لازمه کتابخونه های مرتبط با ماژول به نام های Adafruit_BME280_Library و Adafruit_Sensor رو نصب کنید.با نصب کتابخونه های مرتبط نرم افزار Arduino IDE رو باز کنید و به مسیر زیر برید File > Examples > Adafruit BME280 library > bme280 test
.
/*********
  Complete project details at http://randomnerdtutorials.com
*********/

#include <Wire.h>
#include <Adafruit_Sensor.h>
#include <Adafruit_BME280.h>

/*#include <SPI.h>
#define BME_SCK 18
#define BME_MISO 19
#define BME_MOSI 23
#define BME_CS 5*/

#define SEALEVELPRESSURE_HPA (۱۰۱۳.۲۵)

Adafruit_BME280 bme; // I2C
//Adafruit_BME280 bme(BME_CS); // hardware SPI
//Adafruit_BME280 bme(BME_CS, BME_MOSI, BME_MISO, BME_SCK); // software SPI

unsigned long delayTime;

void setup() {
    Serial.begin(۹۶۰۰);
    Serial.println(F("BME280 test"));

    bool status;

    // default settings
    // (you can also pass in a Wire library object like &Wire2)
    status = bme.begin(0x76);
    if (!status) {
        Serial.println("Could not find a valid BME280 sensor, check wiring!");
        while (۱);
    }

    Serial.println("-- Default Test --");
    delayTime = ۱۰۰۰;

    Serial.println();
}


void loop() {
    printValues();
    delay(delayTime);
}


void printValues() {
    Serial.print("Temperature = ");
    Serial.print(bme.readTemperature());
    Serial.println(" *C");

    Serial.print("Pressure = ");

    Serial.print(bme.readPressure() / ۱۰۰.۰F);
    Serial.println(" hPa");

    Serial.print("Approx. Altitude = ");
    Serial.print(bme.readAltitude(SEALEVELPRESSURE_HPA));
    Serial.println(" m");

    Serial.print("Humidity = ");
    Serial.print(bme.readHumidity());
    Serial.println(" %");

    Serial.println();
}

/***************************************************************************
  This is a library for the BME280 humidity, temperature & pressure sensor

  Designed specifically to work with the Adafruit BME280 Breakout
  ----> http://www.adafruit.com/products/2650

  These sensors use I2C or SPI to communicate, 2 or 4 pins are required
  to interface. The device's I2C address is either 0x76 or 0x77.

  Adafruit invests time and resources providing this open source code,
  please support Adafruit andopen-source hardware by purchasing products
  from Adafruit!

  Written by Limor Fried & Kevin Townsend for Adafruit Industries.
  BSD license, all text above must be included in any redistribution
 ***************************************************************************/
باتوجه به این که در این مدار از پروتکل i2c استفاده شده در سورس برنامه قسمت مربوط به spi کامنت شده که شما در صورت نیاز به استفاده از این پروتکل باید این قسمت که در ادامه نیز نشان داده شده رو از کامنت خارج کنید و دستور مربوط به i2c رو کامنت کنید
:
/*#include <SPI.h>
#define BME_SCK 18
#define BME_MISO 19
#define BME_MOSI 23
#define BME_CS 5*/
البته در صورت استفاده از spi پایه های ارتباط ماژول و سنسور رو به صورت زیر باید تغییر بدین
.
| SPI |
MOSI |
MISO |
CLK |
CS |
| HSPI |
GPIO 13 |
GPIO 12 |
GPIO 14 |
GPIO 15 |
| VSPI |
GPIO 23 |
GPIO 19 |
GPIO 18 |
GPIO 5 |

ضریب فشار برای بدست آوردن ارتفاع
همونطور که در سورس بالا دیدید ضریبی به نام SEALEVELPRESSURE_HPA ساخته شده ، این ضریب برای تبدیل فشار به دست امده به ارتفاع نسبی هست.
#define SEALEVELPRESSURE_HPA (1013.25)
البته این ضریب بسته به منطقه جغرافیای شما ممکن است نیاز به تغییر داشته باشه
I2C
همونطور که در ابتدا نیز گفته شده در این پروژه از پروتکل i2c برای ارتباط با سنسور استفاده شده که دستور زیر مربوط به همین پروتکل هست
Adafruit_BME280 bme; // I2C
درصورت نیاز به استفاده از پروتکل spi خط بالا رو کامنت کنید و خطوط زیر رو از حالت کامنت خارج کنید
//Adafruit_BME280 bme(BME_CS); // hardware SPI
//Adafruit_BME280 bme(BME_CS, BME_MOSI, BME_MISO, BME_SCK); // software SPI
البته سورس بالا برای تست بود و سورس اصلی به همراه صفحه وب کد زیر میباشد
.
/*********
  Rui Santos
  Complete project details at http://randomnerdtutorials.com
*********/

// Load Wi-Fi library
#include <WiFi.h>
#include <Wire.h>
#include <Adafruit_BME280.h>
#include <Adafruit_Sensor.h>

//uncomment the following lines if you're using SPI
/*#include <SPI.h>
#define BME_SCK 18
#define BME_MISO 19
#define BME_MOSI 23
#define BME_CS 5*/

#define SEALEVELPRESSURE_HPA (۱۰۱۳.۲۵)

Adafruit_BME280 bme; // I2C
//Adafruit_BME280 bme(BME_CS); // hardware SPI
//Adafruit_BME280 bme(BME_CS, BME_MOSI, BME_MISO, BME_SCK); // software SPI

// Replace with your network credentials
const char* ssid     = "REPLACE_WITH_YOUR_SSID";
const char* password = "REPLACE_WITH_YOUR_PASSWORD";

// Set web server port number to 80
WiFiServer server(۸۰);

// Variable to store the HTTP request
String header;

void setup() {
  Serial.begin(۱۱۵۲۰۰);
  bool status;

  // default settings
  // (you can also pass in a Wire library object like &Wire2)
  //status = bme.begin();
  if (!bme.begin(0x76)) {
    Serial.println("Could not find a valid BME280 sensor, check wiring!");
    while (۱);
  }

  // Connect to Wi-Fi network with SSID and password
  Serial.print("Connecting to ");
  Serial.println(ssid);
  WiFi.begin(ssid, password);
  while (WiFi.status() != WL_CONNECTED) {
    delay(۵۰۰);
    Serial.print(".");
  }
  // Print local IP address and start web server
  Serial.println("");
  Serial.println("WiFi connected.");
  Serial.println("IP address: ");
  Serial.println(WiFi.localIP());
  server.begin();
}

void loop(){
  WiFiClient client = server.available();   // Listen for incoming clients

  if (client) {                             // If a new client connects,
    Serial.println("New Client.");          // print a message out in the serial port
    String currentLine = "";                // make a String to hold incoming data from the client
    while (client.connected()) {            // loop while the client's connected
      if (client.available()) {             // if there's bytes to read from the client,
        char c = client.read();             // read a byte, then
        Serial.write(c);                    // print it out the serial monitor
        header += c;
        if (c == '\n') {                    // if the byte is a newline character
          // if the current line is blank, you got two newline characters in a row.
          // that's the end of the client HTTP request, so send a response:
          if (currentLine.length() == ۰) {
            // HTTP headers always start with a response code (e.g. HTTP/1.1 200 OK)
            // and a content-type so the client knows what's coming, then a blank line:
            client.println("HTTP/1.1 200 OK");
            client.println("Content-type:text/html");
            client.println("Connection: close");
            client.println();

            // Display the HTML web page
            client.println("<!DOCTYPE html><html>");
            client.println("<head><meta name=\"viewport\" content=\"width=device-width, initial-scale=1\">");
            client.println("<link rel=\"icon\" href=\"data:,\">");
            // CSS to style the table
            client.println("<style>body { text-align: center; font-family: \"Trebuchet MS\", Arial;}");
            client.println("table { border-collapse: collapse; width:35%; margin-left:auto; margin-right:auto; }");
            client.println("th { padding: 12px; background-color: #0043af; color: white; }");
            client.println("tr { border: 1px solid #ddd; padding: 12px; }");
            client.println("tr:hover { background-color: #bcbcbc; }");
            client.println("td { border: none; padding: 12px; }");
            client.println(".sensor { color:white; font-weight: bold; background-color: #bcbcbc; padding: 1px; }");

            // Web Page Heading
            client.println("</style></head><body><h1>ESP32 with BME280</h1>");
            client.println("<table><tr><th>MEASUREMENT</th><th>VALUE</th></tr>");
            client.println("<tr><td>Temp. Celsius</td><td><span class=\"sensor\">");
            client.println(bme.readTemperature());
            client.println(" *C</span></td></tr>");
            client.println("<tr><td>Temp. Fahrenheit</td><td><span class=\"sensor\">");
            client.println(۱.۸ * bme.readTemperature() + ۳۲);
            client.println(" *F</span></td></tr>");
            client.println("<tr><td>Pressure</td><td><span class=\"sensor\">");
            client.println(bme.readPressure() / ۱۰۰.۰F);
            client.println(" hPa</span></td></tr>");
            client.println("<tr><td>Approx. Altitude</td><td><span class=\"sensor\">");
            client.println(bme.readAltitude(SEALEVELPRESSURE_HPA));
            client.println(" m</span></td></tr>");
            client.println("<tr><td>Humidity</td><td><span class=\"sensor\">");
            client.println(bme.readHumidity());
            client.println(" %</span></td></tr>");
            client.println("</body></html>");

            // The HTTP response ends with another blank line
            client.println();
            // Break out of the while loop
            break;
          } else { // if you got a newline, then clear currentLine
            currentLine = "";
          }
        } else if (c != '\r') {  // if you got anything else but a carriage return character,
          currentLine += c;      // add it to the end of the currentLine
        }
      }
    }
    // Clear the header variable
    header = "";
    // Close the connection
    client.stop();
    Serial.println("Client disconnected.");
    Serial.println("");
  }
}
البته در سورس بالا لازمه اطلاعات مودم خودتون رو وارد کنید
const char* ssid     = "";
const char* password = "";
اگر رابط سریال رو در برنامه آردوینو باز کنید میتونید ای پی ماژول رو مشاهده کنید .

البته آی پی ماژول شما ممکنه متفاوت باشه، در هر صورت آی پی ماژول رو در مرورگر کامپیوتر یا موبایل خودتون وارد کنید تا نتیجه رو ببینید البته دقت کنید که موبایل یا کامپیوتر شما به همون مودمی وصل باشه که ماژول شما وصل هست.

به همین سادگی ، البته اگه اطلاعات نیاز بود میتونید پست اصلی این مطلب را از طریق کلیک در اینجا مشاهده کنید . در آخر هم ویدئو توضیحات این پروژه به زبان انگلیسی رو میتونید ببینید.